

Ps 8.56 Application Engine In App Designer Debugging Primer
Staying within the Activity Guide/Nav Collection Target Content Area | AJAXTransfer Parameter
May 3, 2018, 10:06 am
I recently ran into an issue with transfer functions executing from within a Nav Collection (which uses Activity Guide framework). These transfer functions result in the loss of the Navigation panel (Side Page) which is basically exiting from the Nav Collection.
Demo of the problem 
Navigation Collection Definition for reference

Tile Wizard for reference

Solution
The solution to this problem is to use the AJAXTransfer=y parameter in the Content Reference corresponding to the Navigation Collection Tile. The following PeopleBook reference is a must read for anyone who is working on Fluid configurations like Activity Guides, Nav Collections, Master Detail pages, etc.
Working with Two Panel Implementations
To fix the issue, I added &AJAXTransfer=y to the Tile Content Reference - Portal URL as follows:

Result

PeopleTools - Using Google Analytics (gtag.js)
May 3, 2018, 1:25 pm
In the past I have written about implementing Google Analytics in PeopleSoft.
Using analytics.js
Using ga.js
If we look at the latest script provided by Google Analytics, it uses the new JavaScript tagging framework gtag.js. This framework allows us to send event data to different products (Analytics, AdWords, DoubleClick, etc.) without managing them separately.
More on gtag.js: https://developers.google.com/gtagjs/
Global Tracking Code Snippet: https://developers.google.com/analytics/devguides/collection/gtagjs/
If we want to implement Google Analytics in PeopleTools using this latest framework, we cannot simply take the sample code provided by Google and include it in a HTML object in PeopleTools. If you notice, even in my previous Google Analytics posts, I modified the sample code to make it PeopleTools friendly. This is because the script tags within the sample code (which involves loading an external script) will cause issues with PeopleTools when created as a JavaScript (HTML) object.
So, we need a way to first load the gtag.js (external) script and then execute the subsequent code provided in the sample. Here is a good example of how we can load an external script using javascript.
https://www.nczonline.net/blog/2009/07/28/the-best-way-to-load-external-javascript/
Using this approach, I re-wrote the Google Analytics javascript sample as follows. The loadScript function is very similar to the cskLoadJS function in my JavaScript Injection Framework - CSK_FL_BOOTSTRAP_JS.
Script for referenceNote: You will need to find and replace UA-XXXXXXXX-Y with your GA_TRACKING_ID.
CSK_ANALYTICS_JS JavaScript (HTML) Object 
Next we need to find a way to inject this javascript within all PeopleSoft pages. A simple approach would be to add a line of code at the end of a global delivered javascript such as PT_COMMON or PT_UTIL. For example:

Alternatively, we could use a JavaScript Injection Framework as described here:
https://pe0ples0ft.blogspot.com/p/javascript-injection-framework.html
Regardless of whether we use analytics.js or gtag.js, when we setup the Google site configuration, we should only include the hostname in the default URL.
E.g.: If this is our login URL
http://pi023.hcm92.com:8000/psp/ps/EMPLOYEE/HRMS/?cmd=login
The Default URL should be configured as follows:

PeopleTools - Opt-out option for Google Analytics
June 26, 2018, 4:19 am
With GDPR taking effect on May 25th 2018, an "opt-out" option for tracking cookies is a prevalent topic in many forums. This post is not intended to provide guidance for GDPR compliance. FWIW, before implementing anything at the PeopleTools layer, we must first consider the privacy policy implications at a much broader organizational level.
That said, I have written several posts on how to implement Google Analytics in PeopleTools. The most recent approach uses gtag.js.
PeopleTools - Using Google Analytics (gtag.js)
This post describes a proof of concept to extend the gtag.js implementation to provide a simple "opt-out" feature for end users using client side code (javascript).
DemoIn the following video, we can see that the user selects the "opt-out" option and the custom opt-out cookie is created. Any subsequent requests will not be tracked in Google Analytics.

Google Analytics Real-Time Data

In the following video, we can see that the user dismisses the "opt-out" option and the custom opt-out cookie is not created. Any subsequent requests will continue to be tracked in Google Analytics.

Google Analytics Real-Time Data

Script for reference Notes
- This version of javascript, identifies the existence of Google Analytics related cookies to check if the session is new.
- If the session is new, a popup message is displayed to the end user. The message also provides a link to "opt-out" of Google Analytics. For the purposes of this demo, I used the delivered ptSetConfirmationMessage and ptCloseConfirmation javascript functions (which are part of PT_UTIL_BASIC HTML object) to display this message.
- If the user chooses to "opt-out" of Google Analytics, the following window property is set to true.
window['ga-disable-UA-XXXXXX-Y'] = true;
- Additionally, a custom cookie (ga-disable-UA-XXXXXXXX-Y) is created to identify this choice for subsequent requests.
- This cookie preference/choice will persist as long as this custom cookie is present.
This proof of concept is only intended to provide implementation ideas. You will most certainly need to tweak this code based on your organization's privacy policy.
Useful Resourceshttps://developers.google.com/analytics/devguides/collection/analyticsjs/user-opt-out
https://developers.google.com/analytics/devguides/collection/gajs/
https://www.robert-matthees.de/datenschutz-cookies/
Implementing Google Analytics in PeopleTools using gtag.js
Implementing Google Analytics in PeopleTools using analytics.js
Implementing Google Analytics in PeopleTools using ga.js
Decoupling the 'Add to' Homepages, Favorites and NavBar Functionality
September 18, 2018, 12:35 pm
As delivered, the 'Add to' functionality - Add to Homepage, Add to NavBar, Add to Favorites, which is available in the New User Interface (NUI) is all or nothing. That is how it works as designed in PeopleTools.

What this means is that, we cannot simply remove access to 'Add to Homepage...' while allowing access to 'Add to NavBar' and/or 'Add to Favorites'. Basically there is no granularity in the security access. The access to the 'Add to' functionality is mainly controlled via the following weblib from a security point of view:
WEBLIB_PTNUI.PT_BUTTON_PIN.FieldFormula.IScript_SavePin
Note: There are some other configurations that may impact the display of the 'Add to' options. Refer MOS Doc ID 1983068.1 for more details.
My Oracle Support Reference DocumentsE-FLUID: How To Restrict Users From Adding Homepages or Tiles in Fluid Homepages (Doc ID 1983068.1)
Bug 26290030: THE ADD TO FUNCTIONALITY NEEDS ENHANCEMENT
Clearly, this is not ideal. I worked on a requirement recently to decouple the security for the 'Add to' functionality. This also seems to be a common request among other PeopleSoft customers as well. For example: https://community.oracle.com/message/14937074#14937074
Here are the steps to decouple the 'Add to' functionality.
Step 1: Create a custom weblib
The IScripts in this custom weblib are primarily for dummy purposes. We can see that there is no code in the IScript.

PeopleCode Snippet for Reference:
Step 2: Update IScript_ShowPinMenu
This customization will take care of the 'Add to' functionality in Classic.


PeopleCode Snippet for Reference
Step 3: Update PT_HEADERPAGE.Activate (Page PeopleCode)
This customization will take care of the 'Add to' functionality in Fluid.


PeopleCode Snippet for Reference
Step 4: Security Configuration
Provide Full Access to the following delivered IScripts:
WEBLIB_PTNUI.PT_BUTTON_PIN.FieldFormula.IScript_ShowPinMenu
WEBLIB_PTNUI.PT_BUTTON_PIN.FieldFormula.IScript_SavePin
This is provide the delivered 'all or nothing' access to the delivered 'Add to' functionality.

Now we are ready to control the decoupled 'Add to' functionality using the custom weblibs. We can selectively provide granular access to the following custom weblibs based on our requirements.
Add to Homepage:WEBLIB_CSK_PIN.ISCRIPT1.FieldFormula.IScript_AddToHomepage
Add to NavBar:WEBLIB_CSK_PIN.ISCRIPT1.FieldFormula.IScript_AddToNavBar
Add to Favorites:WEBLIB_CSK_PIN.ISCRIPT1.FieldFormula.IScript_AddToFavorites
In the example below, I am choosing to provide access to 'Add to NavBar' and 'Add to Favorites' but not to 'Add to Homepage'.

Results
Fluid Page: 
Classic Page:

Tile Wizard API - Part 4 - Dynamic Target Page
September 21, 2018, 5:57 pm
I previously wrote a series of posts on Tile Wizard API which allows us to control the display of the Tile Content using PeopleCode.
Part 1: Dynamic Tile Content
Part 2: Dynamic Tile Images
Part 3: Dynamic Tile Styling
These posts mainly focused on the content of the Tile as expected because the Application Class delivered by Oracle was mainly for the purpose of manipulating 'Tile Content'.
Marcin Tomczak asked the question:
"Can we make the tile point to a different external page than the tile itself?"
This made me wonder if we can dynamically change the target/destination page (internal/external) of a tile using PeopleCode? It is technically not a feature as per the design/implementation of the Tile Class. But there is an error/exception processing option that is available which might enable us to "hack" the Tile Class to do something it was not originally intended for.
Tile Class Properties - hasContent
Tile Class Properties - PreferencesURLLabel
Tile Class Properties - PreferencesURL
The hasContent property allows us to enable the error/exception mode where we can set a different image, destination URL and URL label. While it is technically not an error scenario in this case, we can still set it in error/exception mode to dynamically modify the Tile destination/target page!
Demo
- As you can see in the demo, the Tile 'Dynamic Target' is created using Tile Wizard with a destination page as 'My System Profile'. This destination has no significance because the 'Disable Main Hotspot' is set to 'Yes'.
- Once the role 'SV_ROLE_1' is added to PS user, we can see the new image and 'My Preferences' URL is enabled for the 'Dynamic Target' tile via the Tile App Class.
- When the role is switched to 'SV_ROLE_2', we can see the 'Change My Password' URL is enabled for the 'Dynamic Target' tile via the Tile App Class.
- When the role is switched to 'SV_ROLE_3', we can see the 'Google Search' external URL is enabled for the 'Dynamic Target' tile via the Tile App Class.

Tile Wizard Settings


App Package PeopleCode

Environment Details
- CS 9.2 PUM Image 4
- PeopleTools 8.55.12
PeopleTools 8.57 | Branding Administration Access and New Roles
October 19, 2018, 7:22 am
Most of you know that PeopleTools 8.57 is generally available on Oracle Cloud. I used a trial account to install a PUM image (HCM 9.2 PI 27 - PT 8.56) using Cloud Manager 7 running on Oracle Cloud Infrastructure - Classic. Once I got the PUM image up and running, I then upgraded it to PeopleTools 8.57.01!
The first thing I noticed while accessing some of the existing (pre-PT 8.57) Branding pages is that I was getting a new (strange) new security error.
Here are some example pages which had this problem:
PeopleTools > Portal > Branding > Branding Objects
PeopleTools > Portal > Branding > Define Headers and Footers

'Secure Branding Administrator' Role
This error occurs even if we already have access to the previously known "all powerful" roles such as 'Portal Administrator' and 'PeopleSoft Administrator' which should usually give us full access to Portal functionality. But in PeopleTools 8.57, there is an additional role called 'Secure Branding Administrator' which is used to control access to certain Branding pages. This condition is hard-coded on the Component SearchInit peoplecode as shown below in this example.

'Secure Branding Administrator' Role

Once we add this role to the required users, they should be able to view the affected Branding related pages.
'Company Info Administrator' Role
Once we get past this security error, I am assuming most Branding admins would want to review the much awaited 'Company Info' feature in PT 8.57.
PeopleBook: Configuring a Custom Banner
Now, if we follow the steps in the PeopleBook and try to find the ' CompanyInfo ' element in the DEFAULT_HEADER_FLUID header definition, it is nowhere to be seen. We can see that the element is referenced in the order property of pthdr2container as shown below. But we cannot yet see the ' CompanyInfo ' which should be the second element under DEFAULT_HEADER_FLUID after ptdropdownmenu and before pthdr2container .

Again, in PT 8.57, there is a new delivered role called 'Company Info Administrator' which is required for us to be able to view and configure the 'Company Info' element. As shown below, we can see the CompanyInfo element after adding the 'Company Info Administrator' role to the user in question.

'PeopleTools SVG Administrator' Role
Lastly, if we want the ability to upload SVG images using the Rich Text Editor (RTE) that is provided in the 'CompanyInfo' element's additional options, then we must have access to a new delivered role called 'PeopleTools SVG Administrator'.
Uploading a SVG image using the Rich Text Editor without 'PeopleTools SVG Administator' Role will generate the following error.


Bug with 'PeopleTools SVG Administrator' Role
When I was testing the SVG image upload feature using the Rich Text Editor available on the CompanyInfo element - 'Additional Options', I found that we could upload a SVG without any issues even if we did not have access to 'PeopleTools SVG Administrator' role in some cases.
Then I found that the code that checks for this condition is case sensitive! 😂

This means that if we upload a SVG image with a capitalized extension (e.g.: CSK_LOGO_32.SVG instead of CSK_LOGO_32.svg), we can simply bypass the security check. The following Bug has been logged with Oracle Support.
BUG 28818544 - E-SEC USER WITHOUT THE PEOPLETOOLS SVG ADMINISTRATOR CAN STILL ADD .SVG IMAGES
Using Role Alias Functionality instead of using Delivered Roles
For many PeopleSoft customers, it may not be an ideal practice to add/use delivered roles in a production environment. To avoid having to use delivered roles that are hard-coded in conditional peoplecode (as is the case with the roles discussed in this post), we can use the 'Role Aliases' functionality which is a hugely understated security feature introduced in PeopleTools 8.55.
PeopleBook Reference: Using Role and Permission List Aliases
Portal General Settings Migration
October 19, 2018, 12:51 pm
From time to time, we may need to make adjustments to the 'General Settings' page under PeopleTools > Portal.


What if we want to migrate/script these changes instead of manually performing the updates in each environment?
Portal Description, Default Template, Owner ID and Folder Navigation
Any changes to the Portal Description, Default Template, Owner ID and Folder Navigation can be simply migrated using the Portal definition as shown below.

Migration

Portal Search, Navigation and Header Frame Options

The Portal Search, Navigation and Header Frame Options are all stored as CREF attributes of a hidden content reference (PT_PORTAL_PROFILE_APPS91). Again, we can simply migrate this CREF object for any associated changes.
Content Reference 
Content Reference Attributes


Migration

Node Templates
Finally, the Node Templates appears to be stored directly in PSPRDMCNTPRV SQL table. So, if we want to automate a change to these values, we can simply write a SQL script to update the necessary rows in this table.

Migration

PeopleTools 8.57 | Testing the New App Designer Utility Features
October 21, 2018, 12:57 pm
PeopleTools 8.57.01 is now generally available! Once I got an environment up and running on PT 8.57, I tested the latest enhancements to App Designer. Since this early .01 release is currently only available on Oracle Cloud, I thought I would share couple of my favorite features!
Database Name on the Header
It is about time! Certainly a very valuable feature to constantly remind us of the current database as we work. If we have multiple App Designer sessions open, it is quite easy to accidentally make changes in the wrong database!
In the example shown below, PSPDB is the database name of my HCM 9.2 PUM Image (upgraded to 8.57.01).

Property Window for Page Design
This is a fantastic feature which makes page design in PeopleTools - App Designer far more intuitive. It is very similar to some of the popular IDEs such as Eclipse. This feature will drastically reduce the number of mouse clicks required to view/set/update page field properties!

PeopleCode Color Coding for Comments
October 22, 2018, 11:50 am
If you are PeopleSoft Developer you must have noticed this annoying bug which was introduced in PT 8.56. As you can see in the screenshot below, the color coding for comments (green) does not work anymore for multi-line comments!

Demo of the Problem
We can see from the demo video that it is easy to get lost while reading/writing PeopleCode without proper color coding for comments.

Workaround
A colleague at work showed me a trick to force the color coding in PT 8.56 to workaround the original problem. Simply add a SPACE after /* or <*.
Demo of workaround 
PeopleTools 8.57
I can confirm that this bug is fixed in PT 8.57.01!
Demo in PT 8.57 
PeopleTools 8.57 | Getting Started with Custom Banner aka Company Info Configuration
October 22, 2018, 12:25 pm
A new feature was introduced in PeopleTools 8.57 that enables customers to create their own custom banner on top of and in addition to the existing "New User Interface" header consistently on Classic and Fluid.

This is achieved using the Branding Header definition that is configured in our Branding Theme definition.
More details on Header and Theme definitions can be found in PeopleBooks:
Branding Process Overview
Defining Headers and Footers
In the past (pre-8.57), the Branding Header definitions purely represented the Classic header area and we have always had to address the Classic and Fluid branding administration separately. Here is a note from PeopleBooks.

But in the case of the ComponyInfo element which is part of the DEFAULT_HEADER_FLUID header definition, it is a welcome exception wherein we can use a single configuration to handle both (Classic and Fluid).
Getting Started
This blog post will detail what it takes to configure a custom header using the Company Info configuration! The environment used for this post is a HCM 9.2 PUM Image 27 which was originally on PT 8.56.09 and upgraded to PT 8.57.01. The upgrade to 8.57 was administered using PeopleSoft Cloud Manager 7 running on Oracle Cloud Infrastructure - Classic.
As I was getting started - wearing a 'good citizen developer' hat, I cloned the delivered theme (DEFAULT_THEME_FLUID) and header (DEFAULT_HEADER_FLUID) definitions. As shown in the next section, I created custom definitions CSK_THEME_FLUID and CSK_HEADER_FLUID respectively instead of modifying delivered definitions.
Custom Definitions and Branding System Options
PeopleTools > Portal > Branding > Define Headers and Footers
CSK_HEADER_FLUID: Clone of DEFAULT_HEADER_FLUID

PeopleTools > Portal > Branding > Assemble Themes
CSK_THEME_FLUID: Clone of DEFAULT_THEME_FLUID

PeopleTools > Portal > Branding > Branding System Options
Update Branding System Options to reference the custom theme.

Note: If there is any assignment on the 'Assign Branding Themes' page for the current portal (which is typically common in HCM 9.2 PUM images) as shown below, we need to be sure to update this configuration as well.
PeopleTools > Portal > Branding > Assign Themes
Update Default Theme for the current Portal (if assignment exists)

Updating the CompanyInfo Configuration
Now that we created custom definitions, we can update the CompanyInfo element to create our own custom header.
Demo 
As we can see, the CompanyInfo Element can be updated using the Rich Text Editor provided in the Additional Options page. While there is an option to configure different content for Classic and Fluid, I am using the same content for the purpose of this example.


Testing the CompanyInfo element
Now that we configured our custom banner, we should be able to test this right away!
DemoAs we can see in the demonstration below, the custom banner "does not appear to"/will not work on Fluid Homepages or Fluid pages. But it works fine in Classic! 😥

Bug in CompanyInfo/Custom Banner functionality for Fluid
After going around in circles for a long time, I found that there is a hard-coding in the Branding App Package which is responsible for displaying the CompanyInfo element in Fluid. As you can see in the screenshot below, the code assumes that we are using the delivered DEFAULT_HEADER_FLUID definition. In our example, we cloned the delivered header and created our own custom definition called CSK_HEADER_FLUID. So, it will not pick up our custom definitions for Fluid! 😂

Fix to remove hard-coding
We can simply comment out the hard-coding and add code to use a SQLExec to dynamically pull the header definition name from the current theme configured on the Branding System Options! Here is a snippet of the App Class with the modification to the GetCompanyInfoHtml method.

PeopleCode for Reference Demo after applying fix
As you can see from the video below, the Custom Banner ( CompanyInfo element) now shows up on Classic and Fluid consistently. Also, notice that the delivered "Oracle" Logo which was previously present on the top left corner has been removed automatically on the Fluid Homepage! This is an exciting feature in the Branding framework. I hope this can be enhanced in the upcoming patches to obviously remove the hard-coding mentioned in this post and also extend this configuration to allow us to use an App Class! Imagine if we could write our own App Class to dynamically generate this Custom Banner instead of a static rich text value. 🎆🎉

Related Posts
PeopleTools 8.57 | Branding Administration Access and New Roles
PeopleTools 8.57 | Custom Banner/Company Info Configuration - Part 2
October 24, 2018, 9:09 am
In my previous post, I wrote about how to get started with the new Custom Banner/Company Info feature which is now part of PeopleTools 8.57.01.
This post details additional code changes that are necessary to workaround some caching issues. This would be useful for those who plan to use the early release of 8.57.
The following App Class PeopleCode is used by the Company Info functionality:
PTBR_BRANDING.UTILITY.GetCompanyInfoHtml.OnExecute

This App Class is referenced in PT_HEADERPAGE.PageActivate for the display of the Company Info in Fluid:

If we review the App Class (GetCompanyInfoHtml) PeopleCode, we will find that the Branding framework uses Rowset Cache functionality which is a great way to improve performance for fairly static content!
More details on Rowset Cache, usage and associated benefits can be found in PeopleBooks:
Rowset Cache
The disadvantage of using Rowset Cache is that we need to carefully code and make sure that we refresh the data (in the cache) as and when it is appropriate/necessary. Otherwise, we will have situations where cache gets stale but it continues to be referenced, causing a variety of problems. One such problem/scenario exists with the code in the GetCompanyInfoHtml App Class.
Excerpt from PeopleBooks 
Problem Scenario
Let us say, that we went through all the steps described in my previous blog post and created our own Custom Banner (CompanyInfo configuration) in PT 8.57. Now, that we implemented the Company Info functionality, let us say we want to revert back to the delivered theme DEFAULT_THEME_FLUID. This delivered theme is unchanged and does not contain any CompanyInfo configuration.
As you can see in the following screenshots and demo video, even though we have revert to the DEFAULT_THEME_FLUID theme (without any CompanyInfo configuration), there is a Rowset Cache related problem which persists the previous CompanyInfo configuration in Fluid.
Branding System Options and Assign Themes Configuration 

Demo
We can notice the Rowset Cache related issue in this demo. The issue will persist in this scenario regardless of how many times web/app server and browser cache is cleared because the issue is related to stale Rowset Cache.

Cause
There is code in the GetCompanyInfoHtml App Class that assumes:
- There is only one and only one Header definition with the CompanyInfo element configured. It is a no brainer that we certainly can have more that one Header definition with the CompanyInfo element configured.
- If a CompanyInfo element is configured on a Header definition, then that Header definition is currently used in the Default Theme set in the Branding System Options (and Assign Themes) Configuration. It is not necessarily the case that we are currently using a theme with the CompanyInfo element just because one exists.
Both these assumptions can be false as demonstrated in the demo in this post.
Assumption 1 PTBR_BRANDING.UTILITY.GetCompanyInfoHtml.OnExecute
Method: GetFluidBannerHtml

PTBR_BRANDING.UTILITY.GetCompanyInfoHtml.OnExecute
Method: GetClassicBannerHtml

Assumption 2
PTBR_BRANDING.UTILITY.GetCompanyInfoHtml.OnExecute
Method: GetFluidBannerHtml

PTBR_BRANDING.UTILITY.GetCompanyInfoHtml.OnExecute
Method: GetClassicBannerHtml

Custom Code Fixes
Addressing AssumptionsThe following PeopleCode updates will ensure that only the current Header definition (PTBR_LAYOUT_ID) is included in the Rowset cache.
PTBR_BRANDING.UTILITY.GetCompanyInfoHtml.OnExecute
Method: GetFluidBannerHtml

PTBR_BRANDING.UTILITY.GetCompanyInfoHtml.OnExecute
Method: GetClassicBannerHtml

Refreshing Rowset Cache when required
PTBR_BRANDING.UTILITY.GetCompanyInfoHtml.OnExecute
Method: GetFluidBannerHtml

PTBR_BRANDING.UTILITY.GetCompanyInfoHtml.OnExecute
Method: GetClassicBannerHtml

PeopleCode for Reference
Complete PeopleCode is provided for reference at the end of this post.
Solution
As we can see in the demo (after applying the code changes), as soon as we switch from a CompanyInfo based theme to a non-CompanyInfo based theme, the Rowset cache is automatically updated and the changes take effect right away. It does not even require a logout!
Demo 
Customization of PTBR_BRANDING.UTILITY.GetCompanyInfo.OnExecute (8.57.01)
PeopleTools 8.57 | Custom Banner/Company Info Configuration - Part 3
October 29, 2018, 2:02 pm
This post is the third part of a blog series on the latest 'Custom Banner/Company Info' configuration that is available via the Branding Framework in PeopleTools 8.57.
Part 1 and Part 2 detailed how we can get started with this functionality and workaround some minor bugs (which require code fixes). This post will detail how we can use the delivered macros and custom CSS to perform simple CSS overrides on the Custom Header.
Environment Used
HCM 9.2 PUM Image 27 originally on PeopleTools 8.56.09 upgraded to PeopleTools 8.57.01 (inaugural Cloud-First release). The PUM image provisioning and upgrade were administered using PeopleSoft Cloud Manager 7 running on Oracle Cloud Infrastructure - Classic.
Using Theme Macro Sets
To use the delivered macros specifically provided for the Company Info functionality, we must use a theme that uses macro sets.
Delivered Macros for Company Info functionality
In Part 1, I created a simple custom theme (CSK_THEME_FLUID) just to get started with the Company Info functionality. The custom theme was cloned from DEFAULT_THEME_FLUID.
Custom Theme from Part 1 
Update Custom Theme to use Macro Set
The following custom definitions were created to allow us to utilize Theme Macro Sets.
| Custom Definition | Type | Cloned From |
| CSK_BRAND_CLASSIC_TEMPLATE_857 | Style Sheet | PT_BRAND_CLASSIC_TEMPLTE_FLUID |
| CSK_BRAND_FLUID_TEMPLATE_857 | Style Sheet | PT_BRAND_FLUID_TEMPLATE_857 |
| CSK_DEFAULT_MACROSET_857 | Macro Set | PT_DEFAULT_MACROSET_857 |
The custom theme (CSK_THEME_FLUID) was then updated as follows.

More details on Theme Macro Sets can be found in the following references.
Theme Macro Sets to override Branding Elements
PeopleTools 8.57 - Defining Macro Sets and Macros
Changing the Background Color of the CompanyInfo Element
Now that we are setup to use Theme Macro Sets, we should be able to leverage the delivered macros to update some basic style properties. For example, we can use the delivered macro PT_COMPINFO_BACKGROUND to override the background color.

Demo

Consistent CSS for Hyperlinks
As we can see in the demo video above, the hyperlink display appears to be different for Fluid and Classic.
Fluid Company Info - Hyperlink 
Fluid Company Info - Hyperlink Hover

Classic Company Info - Hyperlink

Classic Company Info - Hyperlink Hover

Update Custom Classic Theme Style Sheet
Since there are no delivered macros available to override the CSS for CompanyInfo hyperlinks, I updated the custom Classic Theme Style Sheet (CSK_BRAND_CLASSIC_TEMPLATE_857) which we created previously. The following CSS was added to the custom style sheet.

Demo
As we can see in the demo video below, the CompanyInfo hyperlink display in Classic and Fluid is consistent now.

PeopleTools 8.57 | Custom Banner/Company Info Configuration - Part 4
October 31, 2018, 8:16 pm
Thus far, the blog series (Part 1, Part 2 and Part 3) on the 'Custom Banner/Company Info' configuration - available via the Branding Framework in PeopleTools 8.57, detailed an evaluation of the new functionality as delivered. As we can see from some of the demos provided previously, this delivered 'Company Info' feature can currently only display static content such as images, links, text, etc. configured via a Rich Text Editor (RTE). That is, the content will be static and the same for all users.
Wouldn't it be great if we can similarly configure and generate the content of the CompanyInfo element using an 'App Class Method' implementation for dynamic content? But this is not an option that is available in the current delivered functionality.
We know that this is possible based on the options available for other elements within the header definition. For example, pthdr2logofluid .


It would simply be a matter of extending the CompanyInfo element to also allow 'App Class Method' as an implementation option.
Extending 'Custom Banner/Company Info' Configuration for Dynamic Content
Environment UsedHCM 9.2 PUM Image 27 originally on PeopleTools 8.56.09 upgraded to PeopleTools 8.57.01 (inaugural Cloud-First release). The PUM image provisioning and upgrade were administered using PeopleSoft Cloud Manager 7 running on Oracle Cloud Infrastructure - Classic.
This post will detailed how we can extend the delivered 'Custom Banner/Company Info' configuration to generate dynamic content such as a personalized greeting message. This type of an extension will involve minor customizations.
Demo 
Are there any configuration options?
Initially, I pondered if we can use any configuration to extend the existing functionality. For example, PeopleTools > Portal > Branding > System Data > Define Element Types > COMPANYINFO

In theory, we could use this configuration to override the Supporting Application Class for the CompanyInfo element. But soon I found that the amount of hard-coded references to the PTBR_BRANDING application classes in several locations basically rules this out as an option. Here are some examples.


Therefore, it is much easier to simply customize the appropriate code that generates the CompanyInfo content for Classic and Fluid respectively.
Dynamic Content Implementation
Include substitution parameters in RTE 
We can also use the 'Source' option in the RTE to wrap the substitution parameter (:1) with HTML elements and attributes. In this example, I wrapped :1 within a <span> element and also included an id attribute which will allow us to apply targeted styles to the dynamic content as per our requirements.

Generating Dynamic Content for Classic
The following PeopleCode snippet was included in PTBR_BRANDING.Elements.CompanyInfoConfigurator.OnExecute - getHTML method.

Generating Dynamic Content for Fluid
Similarly, the following PeopleCode snippet was included in PTBR_BRANDING.UTILITY.GetCompanyInfoHtml.OnExecute - GetFluidBannerHtml method.

Custom CSS for Dynamic Content
Finally, we can use the id attribute (cskWelcome) of the dynamic content to target any custom CSS as per our requirements. In this example, the following CSS was appended to Classic (CSK_BRAND_CLASSIC_TEMPLATE_857) and Fluid (CSK_BRAND_FLUID_TEMPLATE_857) theme style sheets.


Classic/Fluid Home NavBar Tiles
January 16, 2019, 12:02 pm
A reader asked the question:
Is there a possibility of having both options Classic Home and Fluid home on the NavBar?
As delivered and by design (for good reason, if I may add), there is conditional logic that determines if the 'Classic Home' or 'Fluid Home' appears on the NavBar.
Refer My Oracle Support Document:
E-FLUID: What is the correct display of Fluid Home vs Classic Home Tile in the Fluid Navbar in 8.55? (Doc ID 2264247.1)
Basically, if the 'Home' icon on the Branding header points to 'Fluid Home', then 'Classic Home' tile appears on the NavBar. Alternatively, if the 'Home' icon on the Branding header points to 'Classic Home', then 'Fluid Home' Tile appears on the NavBar.
If for some reason, we want both the tiles ('Classic Home' and 'Fluid Home') to appear on the NavBar, then we will need to resort to a PeopleCode customization. We will need to comment out the following block of code which performs this delivered conditional logic.
Disclaimer: I don't recommend this approach as it is not the intended behavior of these delivered tiles on the NavBar. But since the question was asked, I am sharing this workaround/solution.

Fluid UI - Working with Grids - Part 2 - Actionable Rows
January 21, 2019, 10:22 am
Previously, I wrote about how we can create responsive grids in Fluid. In that post, the focus was to demonstrate how we can make grids, which are one of the more complex UI elements, responsive/adaptive in Fluid. For the purposes of that demo, we simply used 'Display Only' grids.
Refer: Working with Grids
There was an interesting question which came up in the comments section of that post. How do we enable the 'Chevron' icon which makes a row 'tapable' (actionable)? We can notice this style/feature in most of the delivered pages with grids.

When I started looking into this feature, I found that the documentation is not very straight forward. Here are some useful references on this topic:
PeopleSoft Fluid UX Standards > Grids > Grid Constructs > Tappable Grid Rows and Hotspots
CSS Guide for PeopleSoft Fluid User Interface (psc_show-actionable class)
From CSS Guide for psc_show-actionable class description:
"... If this is used on a FLEX grid, it is expected that a display-only (as text) field will be used as the last field on the grid having the style psc_more applied to it. This field may or may not have content."
This post will cover how we can enable actionable rows using two examples from Part 1.
Flex Grid Layout ExampleRefer Part 1: Fluid UI - Working with Grids
- First, the previous project (available on GitHub) from Part 1 was copied to my target database using the 'Copy from File' option in App Designer. Then, the component was updated to remove the pages which will not be used for this demonstration.

- The Grid (LOCATION_TBL) properties were modified to remove the 'Display Only' setting. If the Grid is 'Display Only', we cannot make it tapable/actionable. Additionally, psc_show-actionable style class was added in the Grid - Fluid Properties tab.
- Then, all the fields in the Grid were set to 'Display Only' because I wanted my Grid columns to remain 'Display Only'.

- Next a new derived/work record field (SV_FL_WRK.EDIT_BTN) was added as a Push Button/Hyperlink to represent the 'row action trigger field'. This trigger field is where we can execute appropriate action upon a click/tap. For this field to function as the trigger, we must set the 'Execute PC on row/Group Click' property on the Use tab.

- To display the chevron icon on the grid rows which is used to represent 'more' information/actionable rows, a new dummy field (SV_FL_WRK.DUMMY_FIELD) was added to the Grid and set to 'Display Only'. Additionally, the psc_more style class was added in the Fluid tab.

- Finally, we can add PeopleCode on the 'row action trigger field' to perform appropriate action. The following video is a demonstration of the sample PeopleCode event.

Responsive Flex Grid with 2 Columns Example
Refer Part 1: Fluid UI - Working with Grids
Here we will perform similar steps (as in previous example) to demonstrate another case of actionable rows in a Responsive Flex Grid with 2 Columns.
- The Grid properties were updated to set to 'Display Only' and the psc_show-actionable style class was added under the Fluid tab. Next, all the fields in the Grid were made 'Display Only' to maintain the read-only state of the Grid.

- Next, a Group Box was added to represent the stack for the 'row action trigger field' and the chevron (more) icon. Then, the 'row action trigger field' (SV_FL_WRK.EDIT_BTN) and chevron icon (SV_FL_WRK.DUMMY_FIELD) were added to the Grid.
- We can see that the PeopleCode to hide the 'row action trigger' (SV_FL_WRK.EDIT_BTN) is also added to the Page Activate event.

- Finally, we can test the Responsive Flex Grid with 2 Columns on Desktop as well as on a browser emulator masquerading as a mobile device (iPhone 6/7/8) and see how actionable rows display on various form factors.

Conditionally enable/disable the 'row action trigger button'
If we need to, we can simply enable/disable the 'row action trigger button' on specific rows conditionally using PeopleCode. In this example, we can see that the 3rd row in the grid is disabled using Page Activate PeopleCode.

Environment Details
FSCM 9.2 PUM 30
PeopleTools 8.57.02
An updated project containing the objects related to this post (Part 2) is available on GitHub.
GitHub Project: https://github.com/SasankVemana/Fluid-UI-Grid-Demos-2
Installation Instructions- Download the project (Part 2) from GitHub.
- Load the project into your database using 'Tools > Copy Project > From File...' option in App Designer. Note: DO NOT load this in a Production environment.
- You may need to add the component/pages in the project to a permission list for access.
- This project will create a folder under PeopleTools > Portal > Structure and Content > Fluid Structure and Content > Fluid Pages as follows:

- Finally add the Demo Tile (under Fluid Structure and Content > Fluid Pages > Sasank's Fluid Demos > Fluid Grid Demo) to any Homepage either via Homepage Administration (under Fluid Structure and Content > Fluid Homepages) or via User Personalization.
Demo Assumption/Dependency- The demo pages use PS_LOCATION_TBL as the record for the grids. This table should exist in most PeopleSoft Applications (HCM, FSCM, CS) and is required for the demo to work.
- Understanding of steps completed in Part 1.
Fluid UI - Working with Grids
JavaScript Injection Framework - Updates, Bugs and Fixes
March 19, 2019, 2:18 pm
The reason I am writing this blog post is to make readers aware of the latest version of the JavaScript Injection Framework and known bugs/fixes associated with the older versions.
If you read some of my previous posts on Branding and other UI enhancements, you may have come across several attempts made by me to find a means to globally (system wide) inject JavaScript/CSS. Unfortunately, there is no way to do this via delivered configuration/code so I ended up writing custom javascript code.
Over the years, I have made iterative improvements to this code and created a framework of sorts with a minimally invasive customization.
Early (Beta) versionhttps://pe0ples0ft.blogspot.com/2015/11/peopletools-854-branding-part-5b-fluid.html#FluJSInjectionBootstrap
Updated version (using RequireJS)https://pe0ples0ft.blogspot.com/p/javascript-injection-framework.html
As I was making further changes, I moved this framework to GitHub in an effort to better manage the code/versioning.
GitHub Project
https://github.com/SasankVemana/PeopleTools-JavaScript-Injection-Framework
Recently, the following Doc ID was brought to my attention via a twitter post.
Oracle Support Document 2294106.1
E-PIA: Run to HTML,Excel and XML links in Query Manager and Query Viewer spinning for ever while running a report having prompt criteria
Twitter Thread
https://twitter.com/ArcherHuck/status/1085635936053051394
@ArcherHuck Great question! Yes. This was an issue with an older version of my bootstrap code. I ran into a similar issue with Worklist pages as well. See this thread which has the details:https://t.co/CD7eRnBIyL
— Sasank Vemana (@sasank_vemana) January 17, 2019
After reviewing Doc ID 2294106.1, I realized that this issue is most likely caused by a customer who implemented this JavaScript Injection Framework. The issue reported in the Doc ID, is very similar to an existing issue identified with an older version of the framework.
Reported Issue: https://pe0ples0ft.blogspot.com/p/javascript-injection-framework.html#c6317103235239955618
The solution provided by Oracle in the Doc ID is to completely remove the custom framework which is understandable since this is not Oracle code. But this issue can be overcome by using the latest version of the JavaScript Injection Framework. In the latest version of the bootstrap javascript as shown below, the regex pattern is updated to account for an extended list of PeopleSoft URL types.

Additionally, the latest version of the framework that is available on GitHub also addresses and fixes some race conditions (which I ran into under certain circumstances) associated with RequireJS and other custom scripts.
Here are some resources that are very useful to understand common timing issues related to javascript functions and callbacks.
https://blog.kevinchisholm.com/functions-javascript/javascript-callback-functions-the-absolute-basics/
https://www.sitepoint.com/understanding-requirejs-for-effective-javascript-module-loading/
PSSpreadsheet Class Part 2 | Documentation Update, Date Format (converting to epoch) and more
March 21, 2019, 1:12 pm
This is a continuation of 'Using PSSpreadsheet Class in App Engine' where I demonstrated how we can use this new API to generate Excel spreadsheets using PeopleCode. While there were and still are a lot of gaps in the documentation of this API, it provides an easier method to create spreadsheets from PeopleCode.
Documentation Update
Previously, in the notes section, I explained the significance of the second parameter (rowset processing) in the Open method which was not documented in PeopleBooks at that point in time. This has been updated.
PSSpreadSheet - Open Method PeopleBook
This is also documented in the following My Oracle Support - Doc Id which clarifies the RangeApplyStyle method as well.
E-PC: There Is Missing Documentation In PeopleBooks For PeopleCode PSSpreadsheet Class - Methods Open And RangeApplyStyle (Doc ID 2357922.1)
Other useful documents on My Oracle Support are listed below.
E-PC: PSSpreadsheet SetColumnWidth Method Is Not Working (Doc ID 2354586.1)
E-NV: What is RangeApplyStyle() in PSSpreadsheet API ? (Doc ID 2288870.1)
E-PC: PeopleCode API PSSpreadSheet SetActiveSheetName method is not working (Doc ID 2511065.1)
E-PC/NV - Method RangeApplyStyle Of Class PSSpreadsheet Is Not Available On PT8.55 And PT8.56 (Doc ID 2516382.1)
Bug 29384267 : ERRORRETURN-> 255 - FILE IS ALREADY IN OPEN STATE! WITH PSSPREADSHEET
Needless to say, that while some of the reported issues are fixed/clarified, there are still improvements to be made which I hope will follow suit in subsequent releases/patches of PeopleTools.
Date Format for SetCellDateAfter reviewing a comment thread on my previous post, I was curious to find out more about the SetCellDate method.
Comment thread
PSSpreadsheet - SetCellDate PeopleBook

If we see the example provided in PeopleBooks, a value (string) of 120223323 produces a cell (date format) with the following value.
1/2/1970 9:23:43 AM

So what is this mystery number/value 120223323 that magically converts to a date of 1/2/1970 9:23:43 AM? After many days of spinning my wheels, I finally found (thanks to Oracle Support) that this is actually the date in epoch format (date/time in milliseconds since epoch). Wow! Why? 😂
One reason I can think of is that behind the scenes PSSpreadSheet API is implemented in Java (Apache POI) and therefore may require this format to pass into appropriate java methods? My guess is as good as yours. In any case, there is potential for this to be improved where this date calculation/conversion can be masked from the API user (perhaps with an internal conversion) for the date parameter in the SetCellDate method.
Anyway, now how do we calculate the date in epoch timestamp format if we ever want to use this method successfully under the current circumstances? There are some online converters which we can use to get ourselves familiarized with the calculation.
https://www.epochconverter.com/
https://www.freeformatter.com/epoch-timestamp-to-date-converter.html
Note: Keep in mind that the SetCellDate method expects the epoch timestamp to be in milliseconds (some converts provide the timestamp value in seconds which might throw us off when used in PeopleCode).
That said, how do we do this calculation/conversion in PeopleCode? I have not found a delivered function and/or API that helps with this calculation/conversion. So, I resorted to using javascript and executing it on the server side using a very handy technique demonstrated by Jim Marion on his blog here.
JavaScript to convert date to epoch timestamp format (milliseconds)Here is a simple JavaScript that converts a human readable date to epoch timestamp format. You can follow this link to test the code directly in jsFiddle.
https://jsfiddle.net/SasankVemana/bgLk8sez/
Sample PeopleCode Snippet with SetCellDate example JavaScript in Message Catalog (29999, 1) Message Catalog (29000, 1) for reference 
GitHub Project Update
In my previous post, I shared a sample App Engine program that will simply generate Excel spreadsheet using data from a rowset. It was brought to my attention that if a column contains a date/datetime field, then the spreadsheet is not generated as expected. This is definitely a limiting factor when it comes to using the rowset processing option in the PSSpreadSheet class.
I created another GitHub project which creates a spreadsheet via an App Engine which uses non-rowset processing option.
GitHub Project: https://github.com/SasankVemana/PSSpreadsheet-in-App-Engine-2
Enable/Disable Classic Plus without Customizations
March 22, 2019, 1:53 pm
Classic Plus was introduced in PeopleTools 8.56 as a means to unify the look and feel of Classic and Fluid PeopleSoft pages from a styling point of view. If you want a quick overview of how this works, you can go to youtube and watch this fantastic video created by PeopleSoft guru, Graham Smith.
https://www.youtube.com/watch?v=Cg7JmqEkPjk
As you can see in this video, PeopleTools team as well as the Apps teams are delivering many components that are Classic Plus enabled. But not all of them are Classic Plus enabled. In cases were Classic Plus is not enabled on a desired component, we will need to enable it via a Component property (Classic Plus Theme Selection). Alternatively, there may be cases where Classic Plus is enabled as delivered but we may want to disable it on certain components.
In such cases where we have to manually enable/disable Classic Plus, we incur some technical debt in the form of a minor customization to the components involved which needs to be maintained in the future.
Note: Merely enabling this property may not be sufficient to Enable Classic Plus in some advanced cases. Review the following PeopleBook for more details.
Reworking Components for Classic Plus Display
Assuming, we are not dealing with any page refactoring, then we can simply enable/disable Classic Plus using a PeopleCode function!
ConfigureClassicPlusComponent
According to Doc ID 2440035.1, this is a new function in PeopleTools 8.57, although I can see that is exists in PeopleTools 8.56 as well.
Oracle's PeopleSoft PeopleTools 8.57 New Features Overview (Doc ID 2440035.1)

Anyway, why is this exciting? Because we can simply use this function in conjunction with Event Mapping and enable/disable Classic Plus without incurring any customizations.
Event Mapping App Classes Enable Classic Plus Disable Classic Plus Event Mapping - Related Content ServicesPeopleTools > Portal > Related Content Service > Define Related Content Service
Enable Classic Plus Service 
Disable Classic Plus Service

Enable/Disable Classic Plus using Event Mapping Configuration
Let us say, we want to enable Classic Plus on a Classic component that is not using Classic Plus as delivered. We can simply create an event mapping configuration to associate the component with the 'Enable Classic Plus Service'.
As an example, let us use PT_THM_MACROSET component which is not using Classic Plus as delivered (Navigation: PeopleTools > Portal > Branding > Theme Macro Set). As we can see in the demo below, the 'Classic Plus Theme Selection' component property is not set for PT_THM_MACROSET by default. By associating the custom event mapping code which is part of our 'Enable Classic Plus Service' (SV_ENABLE_CLASSIC_PLUS), we can enable Classic Plus on this component without any customization. We can see that behind the scenes (by calling the ConfigureClassicPlusComponent function via Event Mapping PeopleCode) the 'Classic Plus Theme Selection' component property is updated without any effect on the last updated userid/datetime which means that this change will not be marked as a customization.

Similarly, let us say, we want to disable Classic Plus on a Classic component that is already using Classic Plus as delivered. We can simply create an event mapping configuration to associate the component with the 'Disable Classic Plus Service'.
As an example, let us use PEOPLECODE_TRACE component which is using Classic Plus as delivered (Navigation: PeopleTools > Utilities > Debug > PeopleCode Trace). As we can see in the demo below, the 'Classic Plus Theme Selection' component property is already set for PEOPLECODE_TRACE by default. By associating the custom event mapping code which is part of our 'Disable Classic Plus Service' (SV_DISABLE_CLASSIC_PLUS), we can disable Classic Plus on this component without any customization. We can see that behind the scenes (by calling the ConfigureClassicPlusComponent function via Event Mapping PeopleCode) the 'Classic Plus Theme Selection' component property is updated without any effect on the last updated userid/datetime which means that this change will not be marked as a customization.

Environment Details
FSCM 9.2 PUM Image 30
PeopleTools 8.57.02
Fluid UI - Working with Grids - Part 3 - Where are the Previous and Next buttons?
March 29, 2019, 1:58 pm
Someone asked the question if we can use the 'Next' and 'Previous' grid buttons in Fluid similar to Classic?
In Classic, we use the 'Previous' and 'Next' buttons which are available on the Grid Navigation Bar to move past the number of rows defined in the grid 'occurs count'.

When I revisited my previous post on Fluid Grids (Part 2), I realized that I set the Grid Properties - 'Occurs Count' to 5 rows and as a result I could only see 5 rows even though there are 13 rows overall. As you can see in the demo video below, when I search/find a value that is not in the first 5 rows, I can still find them. Only issue is that I cannot freely navigate across the 13 rows.


So, how do we navigate across the various rows in the Fluid grid if we are limited by the 'Occurs Count' as shown in the above example? One way is to use, 'Unlimited Occurs Count' but that is cheating!

Lazy Scrolling
Fortunately for grids, we can enable "lazy scrolling" which will pull in the additional rows dynamically as we scroll down. This method of lazy scrolling (if you will) is aimed at improving the performance of fluid application pages.
PeopleBooks | Enabling Lazy Scrolling for Scrollable Grids

Demo of Lazy Scrolling

Environment Details
FSCM 9.2 PUM 30
PeopleTools 8.57.02
Display 'My Favorite Queries' in NavBar 'Favorites'
June 3, 2019, 2:05 pm
The following question was posted on one of my blog posts:
https://pe0ples0ft.blogspot.com/2018/09/decoupling-add-to-functionality.html#c9053788640685351670
Is there any way to add my favorite queries into the MyFav in fluid via code dynamically?
To provide some context, the delivered 'My Favorite Queries' feature within the 'Query Manager' page allows users to favorite/bookmark frequently used queries. We can see a demo of this feature in the video below.
Add To 'My Favorite Queries' 
The requirement here is to dynamically display the user queries from 'My Favorite Queries' as links/shortcuts in the NavBar - 'Favorites' tile content.
I am sure there are many ways we can achieve this programmatically. As a proof of concept, I used Event Mapping Framework to execute additional custom logic on PTNUI_MYFAV_COMP component PostBuild event. This approach will be customization free!
Why PTNUI_MYFAV_COMP component? Because it is the PeopleTools delivered component used to render the NavBar - 'Favorites' tile content. We can see the content reference PTNUI_NB_FAV that is associated with the PTNUI_MYFAV_COMP component in the screenshot below.

In the custom Event Mapping App Class - which is configured to execute as as post process to the PTNUI_MYFAV_COMP component PostBuild event, I simply appended the current user's 'Favorite Queries' to the NavBar - 'Favorites' Content Collection. We can see a demonstration of 'My Favorite Queries' displayed in the NavBar - 'Favorites' below.

Implementation Details
Download App Designer Project from GitHub: https://github.com/SasankVemana/MyFavQueriesAsNavBarFavorites
Notes:- This feature (implemented using Event Mapping Configuration) is a great value addition to users who frequently use PS Query. That said, all users are not alike and some may not prefer to see all the queries they stashed away in their 'My Favorite Queries' displayed under the NavBar - Favorites. For the purpose of a proof of concept, this solution is implemented for all users. But it could very easily be extended to only display the 'My Favorite Queries' if the users 'opt in'. Please consider any user experience impacts prior to implementing this solution or something similar.
- This solution was created using HCM 9.2 - PUM Image 29 - PeopleTools 8.57.03.
The following Event Mapping App Package/Class contains the custom logic to display 'My Favorite Queries' in the NavBar - 'Favorites' tile content.

SV_EVENT_MAPPING_PKG.NUI.AddMyFavQueries.OnExecute
This app class is mapped to the PTNUI_MYFAV_COMP component PostBuild event. The logic in the Execute method is very similar to that of PTNUI_MYFAV_COMP component PostBuild event.
SV_EVENT_MAPPING_PKG.Utils.PSQueryAsFavorites.OnExecute
This app class is used by the Event Mapping app class (refer line 19 and 20) to append the 'My Favorite Queries' to the NavBar - Favorites Content Collection. This app class is cloned from the delivered PTNUI.NavBarContentArea.Content.MyFavorites.OnExecute app class and updated to meet this requirement.
SV_EXEC_PSQUERY_GBL The following content reference (SV_EXEC_PSQUERY_GBL) was created as a placeholder. This content reference is required to be able to add a link to the NavBar - Favorites Content Collection. I chose to add this CREF under Root > Reporting Tools folder. You can move this to a different Parent Folder per your standards.

This CREF is referenced in SV_EVENT_MAPPING_PKG.Utils.PSQueryAsFavorites.OnExecute (line number 30 and 31) as shown below.

Helper Function -
AppendContentArea This function is called by the custom event mapping app class (line 22) to append a Collection to NavBar Content Area. The logic in this function is cloned/borrowed from the delivered SetContentArea function in PTNUI_DOCK_REC.PTNUI_NB_ACTION.FieldFormula.

Related Content Service Definition
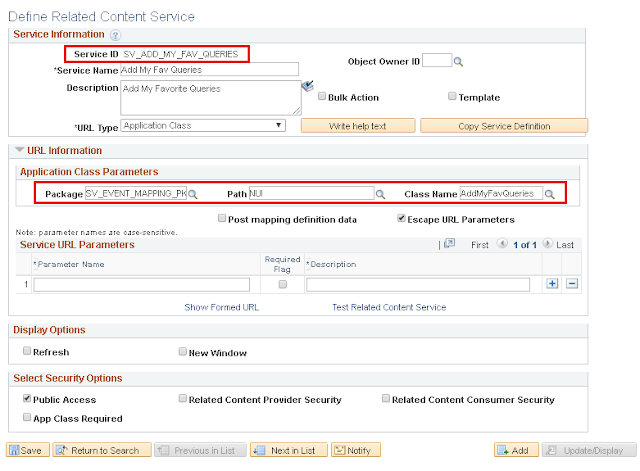
Event Mapping Configuration


Ps 8.56 Application Engine In App Designer Debugging Primer
Source: https://sasank1.rssing.com/chan-63192030/all_p5.html
Posted by: rawlsupocand.blogspot.com
0 Response to "Ps 8.56 Application Engine In App Designer Debugging Primer"
Post a Comment